Sliding Barn Door Installation Process & Costs
Sliding barn door installation is pretty straightforward assuming you follow the directions carefully and take the right safety precautions. As always, make sure you have the right safety equipment (eye and ear protection are critical) and have a clean work space that’s free of obstacles.
A sliding barn door can be installed in a matter of hours assuming you have the right tools and equipment. It’s possible to install a sliding barn door by yourself, but it’s easier and safer to have an extra set of hands. If you have questions or need assistance with your White Shanty sliding barn door, please contact our design team.
***Please note that these installation instructions are specific to White Shanty doors. While they make work for other brands of doors, you should always refer to the manufacturer’s specific installation instructions.***
Tools and Materials
To install a sliding barn door, you will need the following tools:
-
Drill & drill bits
-
Measuring tape
-
L or T square
-
Pencil
-
Socket set/wrenches
-
Screw driver
-
Step ladder
Almost all of the hardware is included with the exception of the screws needed for the door guides. You will need to source specific hardware based on what type of flooring you have.
Installation Steps
1. Door Assembly
Most sliding barn doors come pre-assembled, but there are instances where they may not (like if you order an unfinished door). Board and batten doors are a type of sliding barn door that frequently arrive in pieces and need assembly. White Shanty board and batten doors are grooved for easy installation, and have specific instructions for assembly.
If you have an unfinished door that you plan on finishing, you should do this before the door is assembled, or before you mount hardware and install the door.
2. Install Rollers On Door
The first step in sliding barn door installation is mounting the rollers to the door. This process is different depending on whether you have face mount or top mount roller hardware.
Face Mount Rollers
Face mount rollers have a strap that extends down and mounts to the front of the door. White Shanty doors will have two rollers on each door, and each roller is secured by two lag bolts. You will need to measure and drill holes for the lag bolts.
First, measure 2-½” in from the side of the door and lightly draw a vertical line with a pencil. This is the centerline for the two bolt holes. It’s helpful to use an L-square to make sure your line is parallel with the edge of the door.
Next, determine the vertical position of the bolt holes. Position the roller strap on the door so that the holes in the roller strap are centered over the centerline you just drew. Slide the roller strap so that there is a 2-½” gap between the top of the door and the bottom of the roller wheel. When the roller strap is correctly positioned, use a pencil to mark the two bolt holes on the centerline.
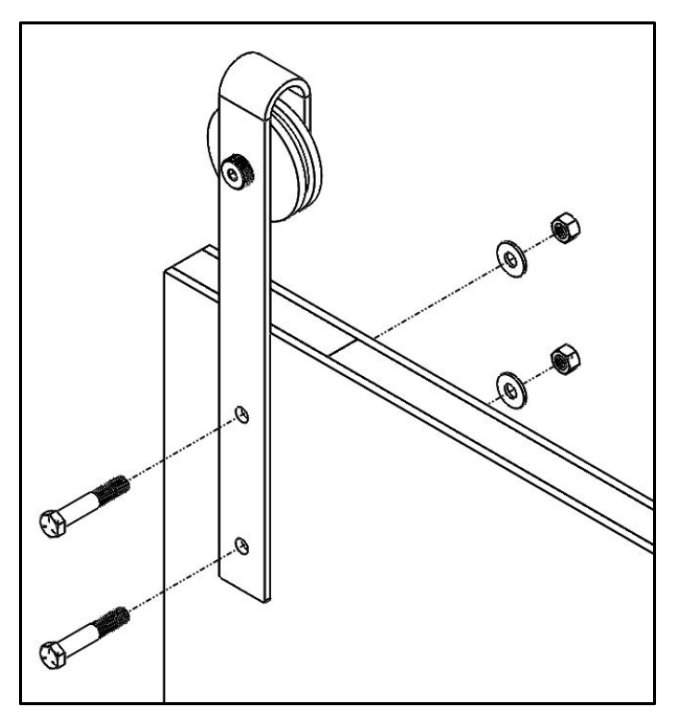
Repeat this process on the other side of the door (left or right depending which side you started on). Once you have marked all four bolt holes, and double checked your measurements, use a ⅜” drill bit to drill through the door. Now you can use the included hex bolts, washers and nuts to bolt the roller strap to the door.
Top Mount Rollers
With top mount rollers, the roller strap is bent 90 degrees to mount to the top of the door. First, measure 2-½” in from the edge of the door and lightly mark it with a pencil. This is where the top roller mount will be centered. Next, find the center of the roller mount and mark it with a pencil too. If the roller mount is 3” wide, the center point will be 1-½” from either side.
Position the top roller mount on the top of the door and align the two marks you made. Ensure the roller mount is aligned horizontally and equal distance from the front and back of the door. Once the mount is positioned correctly, use a pencil to mark the bolt holes. Repeat this process for the other (left or right) side of the door.
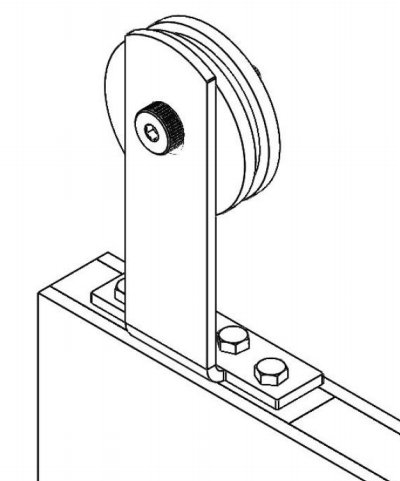
Once you’ve marked your bolt holes, use a 3/16” drill bit to drill holes that are 2-½” deep. Now you can use the included lag bolts to attach the roller mounts to the top of the door.
3. Installing The Wall Track
To install the wall track, you will first need to drill holes in the track itself for the lag bolts that will mount the track to the wall. The lag bolts should be an equal distance apart to distribute the weight of the door. The number of bolts, as well as distance and placement will depend on the length of the track, which varies based on your door configuration.
Depending on the length of the track, it may be shipped in two sections, which you will need to connect using the included track coupler. Position the track coupler and use a ⅜” drill bit to drill holes for the cap screws and nuts.
You will also need to measure for the door stops, which prevent the door from sliding off the end of the track. These should be placed 2” in from the end of the track, on each side.
Once you have determined the placement of the holes for both the door stops and the lag bolts, use a ⅜” drill bit to drill the holes. Now you can mount the door stops using the included cap screws, washers and nuts.
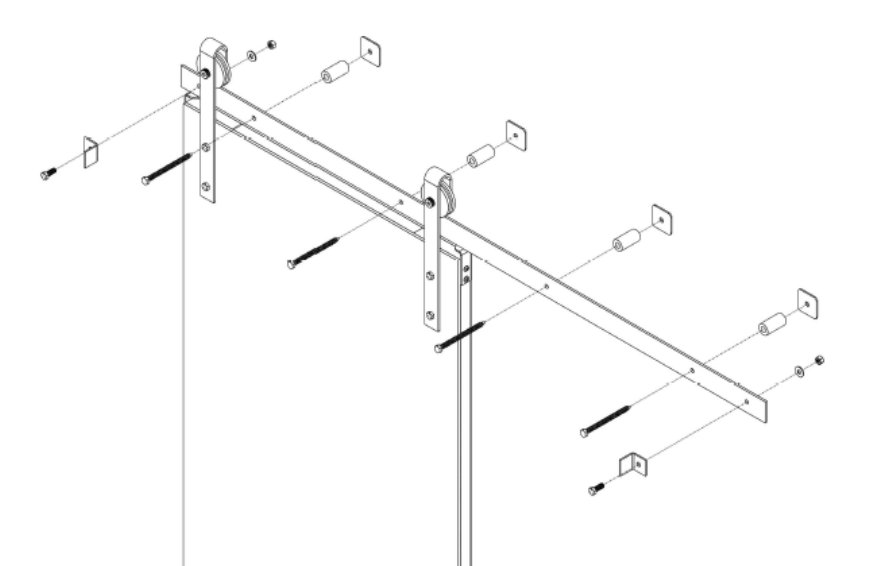
Next you will need to determine the height at which to mount the track. This will need to be measured in the field. Generally speaking, to ensure ½” of ground clearance, the track should be installed so that the center of the track is on a level line that is equal to the height of the door plus 2-½”. You will also need to position the track horizontally so that the closed door fully covers the door opening.
Most importantly, the track needs to be mounted securely, and the lag bolts must be secured into wall studs. When mounting the track, secure it to the wall by using the included lag bolts and spacers.
4. Hanging The Door
Sliding barn doors are heavy and bulky, and you will need help to hang one. Together, grab the side of the door, lift it, and position the rollers on the track.
Installing Locking Systems
There are several locking systems available for sliding barn doors. The most common two are the hook and eye latch, and the tear drop latch. Please note that locking systems are not high security systems, and must have door guides installed to be effective.
Hook & Eye Latch
The hook and eye latch is a simple system often used for fences and gates. The hook is mounted to the door jamb, and the eye is mounted to the door. Each piece is secured using two screws, and the plates must be level for the latch to work.
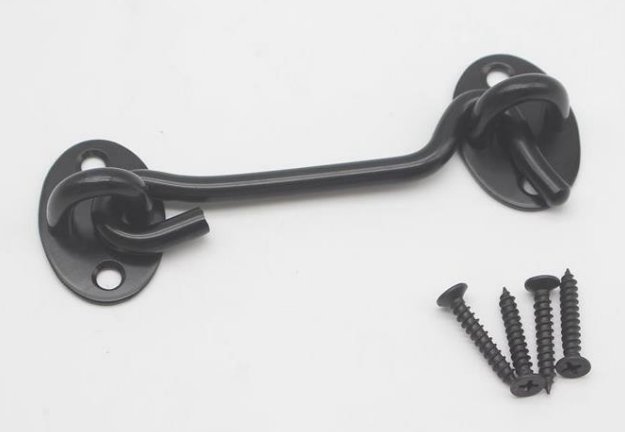
Position the hook plate on the door jamb and ensure the hook is able to swing out far enough to drop into the eye plate on the door. While the hook is positioned in place, mark the position (especially the screw holes) using a pencil. Drill pilot holes for the screws, then attach the hook place using screws.
Next, position the eye latch on the door so that the hook can freely slide in and slide out. Mark the screw holes, and then drill pilot holes in the door before fastening the eye plate.
Tear Drop Latch
A tear drop latch uses a tear drop-shaped metal piece that slides into a slot on the door.
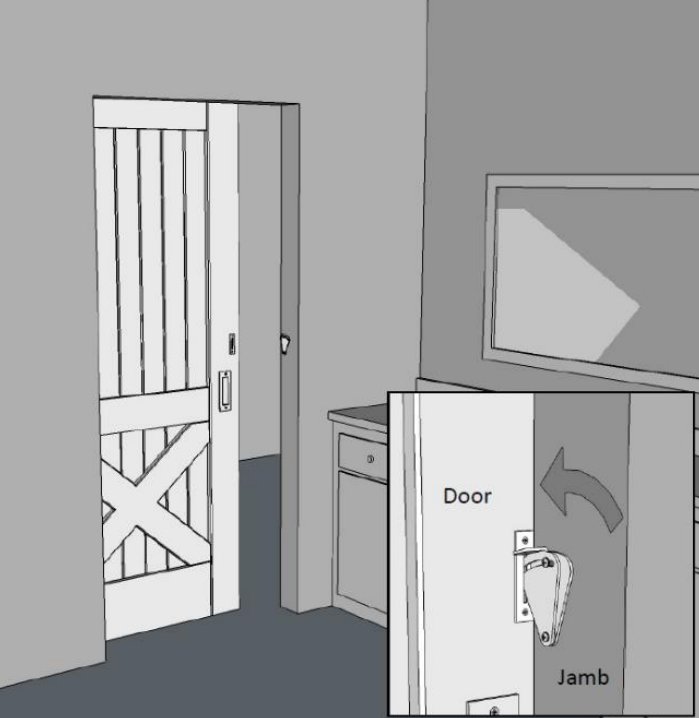
First, position the catch at the desired height on the door and mark the screw holes using a pencil. Drill pilot holes and attach the catch using screws. Next, position the mounting plate on the door jamb so that the top is level with the top of the catch. Ensure the mounting plate is close enough to the door so the tear drop can swing out and engage the catch.

Once your position is set, drill 3 pilot holes then attach the mounting plate to the door jamb using the middle hole. Next, install the latch to the mounting plate using the two screws. Each screw will pass through the latch, a washer, then the mounting plate before screwing into the door jamb. Tighten the screws enough to keep everything in place, but loose enough that the latch can swing out.
Maintenance & Cleaning
Interior sliding barn doors require very little maintenance - just a light cleaning with household supplies. To clean your door of dust and debris, use a soft, clean cloth (preferably microfiber) with water or a mild cleaning product like glass cleaner. Wipe down the face of the door as well as the top of the door. You can also clean the track, which is prone to collect dust due to its layout and location.
For glass or whiteboard doors, you can clean those surfaces with a glass cleaner and a clean cloth.
Sliding Barn Door Installation Cost
Labor costs to install a barn door range from $100-300 depending on where you’re located and the complexity of the installation. Bypass and double barn doors will be on the higher end of the range because of the extra installation steps compared to a single barn door.
